How to Make Fermented Brussels Sprouts (Complete Beginner's Guide)
Last updated March 2026
If you've heard that fermenting Brussels sprouts makes your house smell like a gym locker — you heard right. But here's what nobody tells you: that smell means it's working. By day 21, you'll have a jar of tangy, probiotic-rich sprouts that are genuinely one of the best things you can put on a charcuterie board. This guide walks you through the whole process, including what to expect at every stage so you don't panic and throw away a perfectly good batch.

Quick Snapshot
| Total time | 14–28 days (hands-on: about 15 minutes) |
| Difficulty | Beginner-friendly |
| What you need | Wide-mouth mason jar, non-iodized salt, fresh Brussels sprouts |
| What they taste like | Tangy, salty, crunchy — like a dill pickle with a crunch |
| Smell warning | They'll smell like sulfur the first week or two. That's normal. |
| Fridge life | Up to 6 months |
What Is Lacto-Fermentation (And Is It Safe)?
Lacto-fermentation is the process behind sauerkraut, kimchi, and traditional pickles. You've almost certainly eaten lacto-fermented food before — you just might not have made it yourself. The process is simple: salt creates an environment where beneficial lactic acid bacteria thrive, while harmful bacteria can't survive. No starter culture required. No vinegar. Just salt, water, and time.
Brussels sprouts are essentially tiny cabbages, which makes them ideal for this kind of fermentation. The same bacteria that transform shredded cabbage into sauerkraut will do the same thing to Brussels sprouts — with the added bonus of some impressive health properties along the way.
The Surprising Health Benefit of Fermented Brussels Sprouts
Here's something most Brussels sprout recipes don't mention: fermented Brussels sprouts may actually be better for you than cooked ones, at least when it comes to one specific compound.
Brussels sprouts contain glucoraphanin — a precursor to sulforaphane, which has been studied for its anti-inflammatory properties, gut health support, cardiovascular benefits, and potential cancer-protective effects. The problem is that cooking degrades this compound significantly. Lacto-fermentation, on the other hand, actually increases the amount of bioavailable sulforaphane — because lactic acid bacteria convert glucoraphanin more efficiently than heat. Food microbiologist Kaitlynn Fenley at cultured.guru has written about this mechanism in depth, and the research behind sulforaphane keeps growing.
On top of the sulforaphane benefit, fermented Brussels sprouts are packed with live probiotics that support your gut microbiome. They're not a magic cure-all — but as far as fermented vegetables go, these are nutritional overachievers.
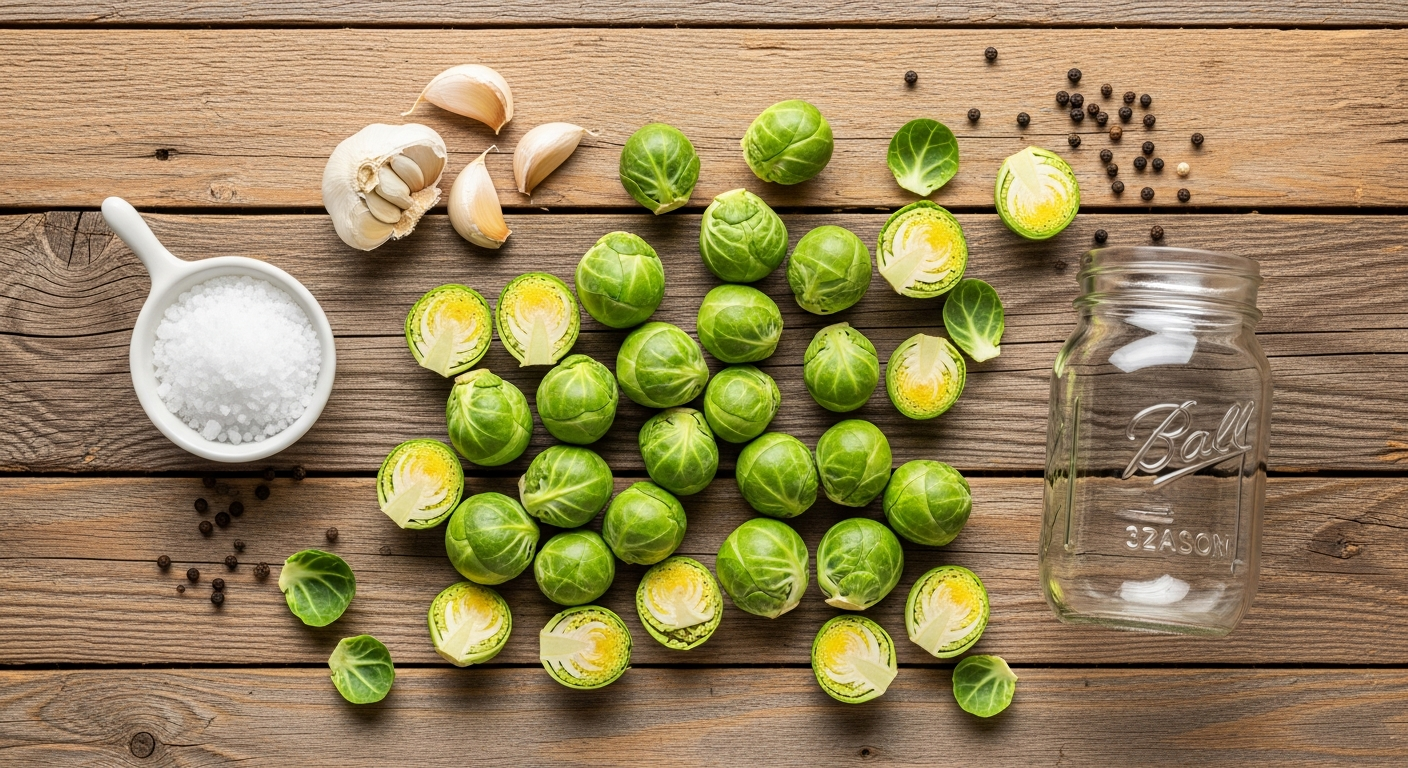
What You'll Need
Good news: you probably already have everything you need for your first batch.

Equipment
- Wide-mouth 32 oz mason jar — the wide mouth matters; it makes packing easier and lets you fit a weight inside. I use Ball wide-mouth jars for all my ferments.
- A weight — something to keep the sprouts submerged under the brine. You can use glass fermentation weights (worth buying if you plan to ferment regularly), a small jam jar filled with water and placed inside the bigger jar, or the simplest option: a zip-lock bag filled with brine. The bag trick works perfectly for beginners.
- A loose lid or cloth cover — do not seal the jar airtight. Gases build up during fermentation and need to escape. A loose lid, a cloth secured with a rubber band, or a specialized airlock lid all work.
Ingredients
For one quart jar:
- 1 pound fresh Brussels sprouts (not frozen — frozen sprouts have been blanched, which kills the natural bacteria you need)
- 1¾ cups filtered or unchlorinated water (tap water with chlorine can inhibit fermentation — either filter it or let it sit out overnight)
- 1 scant teaspoon non-iodized salt — kosher salt, sea salt, or canning salt. NOT regular iodized table salt. The iodine inhibits the bacteria you're trying to cultivate.
The 2% Salt Rule: The most reliable ratio is 2% salt by weight — that's 20g of salt per 1000g of water. If you have a kitchen scale, use it. If not, 1 teaspoon of non-iodized salt per 1 cup of water gets you close enough for a beginner batch.
Optional add-ins (choose one combo or keep it plain):
- 3–4 garlic cloves
- 1-inch piece of fresh ginger, sliced
- 1 tsp black peppercorns
- 1 jalapeño, sliced
- 1 tsp dill seed + 1 tsp mustard seed (for a dill pickle vibe)
- 1 bay leaf
How to Make Fermented Brussels Sprouts
-
Prep your sprouts. Trim the ends, remove any damaged outer leaves, and rinse well. Cut each sprout in half — halving them speeds up fermentation and lets the brine penetrate better.
-
Make your brine. Dissolve the salt fully in the water. If using warm water to help it dissolve, let it cool to room temperature before pouring over the sprouts.
-
Pack the jar. Add any optional add-ins first (garlic, ginger, spices), then pack the halved Brussels sprouts in tightly with the cut sides facing down. Pack them in firmly — they'll soften slightly as they ferment.
-
Pour the brine. Cover the sprouts completely, leaving about 1 to 1.5 inches of headspace at the top. The sprouts must stay submerged under the brine — that's the critical safety point. If they're exposed to air, they can grow mold.
-
Add your weight. Use whichever method works for you: glass fermentation weights, a small jar, or a zip-lock bag filled with brine. If using a bag, fill it with brine (not plain water) — that way, if it leaks, it won't throw off your salt ratio.
-
Cover loosely. Screw on a lid but don't tighten it all the way, or use a cloth cover. The jar needs to off-gas as fermentation produces carbon dioxide.
-
Ferment at room temperature. A temperature between 65–75°F is ideal. Avoid direct sunlight. Check every 2–3 days, and if you're using a screwed-on lid, burp it outside (more on why in the next section).
-
Taste-test starting at day 14. When the flavor is to your liking, move the jar to the refrigerator. The fermentation will slow dramatically in the cold but won't stop completely — the flavor will continue to develop slowly.
The first time I made these, I was sure something had gone wrong around day five. The smell was really something. I almost poured the whole jar down the drain. Stick with it — at day 21 they were the best thing I put on a charcuterie board all year.
Why Your Fermented Brussels Sprouts Smell Like That (And What to Do)
Let's talk about the elephant in the room — or rather, the smell in the kitchen.
Brussels sprouts contain sulfur compounds (glucosinolates) that break down during fermentation and release hydrogen sulfide gas. This is the same compound responsible for the smell of cooked Brussels sprouts — and in a fermenting jar, it's more concentrated. The smell peaks somewhere between days five and ten, then settles significantly. By the time your sprouts are ready to eat, the jar will smell tangy and appetizing, not like sulfur.
The smell means fermentation is working. It is not a sign that something went wrong.
That said, you don't have to live with it. A few practical strategies:
- Place the jar in a gallon zip-lock bag. This catches any drips from burping and contains most of the smell.
- Store it in a cabinet, pantry, or garage — somewhere with some airflow but out of your kitchen if the smell bothers you.
- Burp it outside. If you're using a loose-lidded jar, do your check-ins on the porch or garage. The gas that escapes when you open the jar is the concentrated version — a quick sniff test outside is much more pleasant.
- Don't smell it every single day. It will smell bad during peak fermentation. Trust the timeline instead.
By day 14, the smell should be noticeably mellower. By day 21, it should smell like a good pickle.
Week-by-Week: What to Expect
Here's what a typical batch looks like from day one to done. Use this as your reference so you're not guessing.
| Days | Brine Appearance | Smell | Taste | What to Do |
|---|---|---|---|---|
| 1–3 | Clear | Very faint | Salty water | Leave it alone |
| 5–10 | Cloudy, active bubbles | Strong sulfur — this is normal | Slightly tangy | Don't panic. Burp outside. |
| 14 | Cloudy, slowing down | Noticeably settling | Tangy, mildly sour | First taste test |
| 21 | Cloudy with white sediment | Mild, tangy | Well-developed, pickle-like | Refrigerate for a milder batch |
| 28+ | Clearer, sediment at bottom | Very mild | Bold, complex, slightly funky | Refrigerate for a bolder batch |
Prefer a crunchier, milder sprout? Refrigerate at day 14. Want bold, complex flavor? Wait until day 21–28.
The white sediment that settles at the bottom of the jar is completely harmless — it's the lactic acid bacteria. Give the jar a gentle shake before serving if you want to redistribute it, or just leave it.
Normal vs. Ruined: How to Tell If Your Ferment Is Safe
This is the section I wish I'd had when I was starting out. Most of what looks alarming in a fermenting jar is completely normal.
Normal — do NOT discard:
- Cloudy brine. This is your bacteria working. It's a sign of healthy fermentation.
- White sediment at the bottom. Harmless precipitate from the fermentation process.
- Bubbles or fizzing when you open the jar. Carbon dioxide production — the process is active.
- Sulfur smell, especially in the first two weeks. Expected. Not a problem.
- White film on the surface of the brine. This is kahm yeast — it looks alarming but it's harmless. Just skim it off with a clean spoon and keep going.
Discard if you see:
- Slimy or mushy texture — the sprouts should stay firm (or soften gently at most). Sliminess is a real warning sign.
- Fuzzy mold that isn't white — pink, black, orange, or green fuzzy mold means discard the whole batch.
- A smell that's truly putrid or rotten — this is distinct from the sulfur smell. Sulfur smells sharp and eggy. Spoiled smells rotten and foul. You will know the difference.
- Any unusual color in the sprouts themselves — they should stay green to yellowish-green.
The good news: lacto-fermented vegetables are inherently self-protective. The acidic brine creates an environment that's hostile to pathogens. Genuine spoilage in a properly made ferment is rare — and when it happens, it's unmistakable.
Flavor Variations to Try
Plain is a great place to start. Once you've done one batch and know what the process looks and smells like, adding flavors is easy. Here are four combos worth trying:
- Classic — 3–4 garlic cloves + 1 teaspoon black peppercorns. Clean, savory, crowd-pleasing.
- Garlic Ginger — 3 garlic cloves + 1 inch of fresh ginger, sliced. Slightly spicy, warming, and great for immune support.
- Dill Pickle Style — 1 teaspoon dill seed + 1 teaspoon mustard seed + 1 bay leaf. This tastes the most like a classic dill pickle — it's my personal favorite.
- Spicy — 1 jalapeño, sliced + 3 garlic cloves + a pinch of red pepper flakes. Good heat, mellows during fermentation.
Note that if you use a red cabbage leaf as your weight (a trick from wildveganflower.com), your brine will turn a beautiful pink-purple color. Totally normal and kind of pretty.
How to Eat Fermented Brussels Sprouts
Fermented Brussels sprouts are a condiment and probiotic snack — not a side dish you heat up in the oven. Cooking them will kill the beneficial bacteria, which defeats the purpose.
Eat them cold, straight from the jar, or use them to add a tangy crunch to other foods:
- Straight from the jar — honestly, the most common way I eat them. They're addictive once you get used to the sourness.
- On a charcuterie board — alongside pickles, olives, hard cheeses, and cured meats. They fit right in.
- Chopped into grain bowls or potato salad — adds a tangy depth that's hard to get any other way.
- As a condiment on sandwiches or tacos — slice them thin and use them like you would pickled jalapeños.
- Alongside eggs in the morning — a fermented vegetable with breakfast is one of the best things you can do for your gut health daily.
Frequently Asked Questions
Can you ferment previously frozen Brussels sprouts? No. Frozen Brussels sprouts have been blanched before freezing, which kills the natural lactic acid bacteria on the surface of the vegetable. Those bacteria are what start the fermentation process. Always use fresh sprouts.
How long do fermented Brussels sprouts last in the fridge? Up to 6 months, stored in their brine with the lid on. The flavor continues to develop slowly even in the refrigerator, so a jar at month three will taste different — and usually better — than at week three.
Do I need to boil Brussels sprouts before fermenting? No — and please don't. Boiling kills the natural lactic acid bacteria on the surface of the sprouts, which is exactly what drives the fermentation process. Raw is the right starting point.
My brine is cloudy. Is that okay? Yes, completely normal. Cloudy brine is a visual sign of active bacterial fermentation. It's a good thing. Clear brine is also fine at certain stages — it just means the activity has slowed down.
Can I use iodized table salt? Avoid it. The iodine in regular table salt inhibits lactic acid bacteria growth, which is the whole engine of this process. Use kosher salt, sea salt, or canning and pickling salt.
What's the right salt percentage for fermentation? 2% by weight is the standard, most reliable ratio — 20g of salt per 1000g of water. If you don't have a scale, 1 teaspoon of non-iodized salt per 1 cup of water is a workable approximation. The 2% ratio is well-established in fermentation science and keeps the brine safe without being too salty.