No Chill Pie Crust (Two Easy Methods — Ready to Bake Right Now)
Last updated March 11, 2026
The year I figured out this recipe, it was the day before Thanksgiving and I hadn't made pie crust. I had the filling ready, the pie dish sitting out, and absolutely no plans to wait two hours for dough to chill. So I started researching why pie crust needs to be refrigerated in the first place — and once I understood that, I realized you can skip it entirely if you handle the dough right.
This article gives you two methods: a classic roll-out version that makes two crusts, and a press-in version that takes five minutes and requires no rolling pin at all. Both work without refrigerating the dough.
Quick Snapshot
- Method 1 (Roll-Out): Flakier, yields 2 crusts, about 10 min prep
- Method 2 (Press-In): No rolling pin, 5 min prep, single crust only
- No refrigerator wait needed — just keep your butter cold while you work
- Works for sweet pies, savory pies, and quiche
Why You Can Skip the Chill (The 30-Second Science)
Chilling pie dough does two things. First, it keeps the butter cold so it doesn't melt into the flour before the pie goes into the oven — and cold butter is what creates steam as the crust bakes, which is what creates those flaky layers. Second, it gives the gluten a chance to relax so the crust doesn't shrink while baking.
You can get the same result without refrigerating the dough if you work quickly enough that the butter stays cold on its own, and if you don't overwork the dough. I also add a tablespoon of apple cider vinegar to my ice water — vinegar inhibits gluten formation, which means the gluten doesn't get as tense in the first place. "I add vinegar to every pie crust I make now," and it's made a bigger difference than any other tip I've tried.
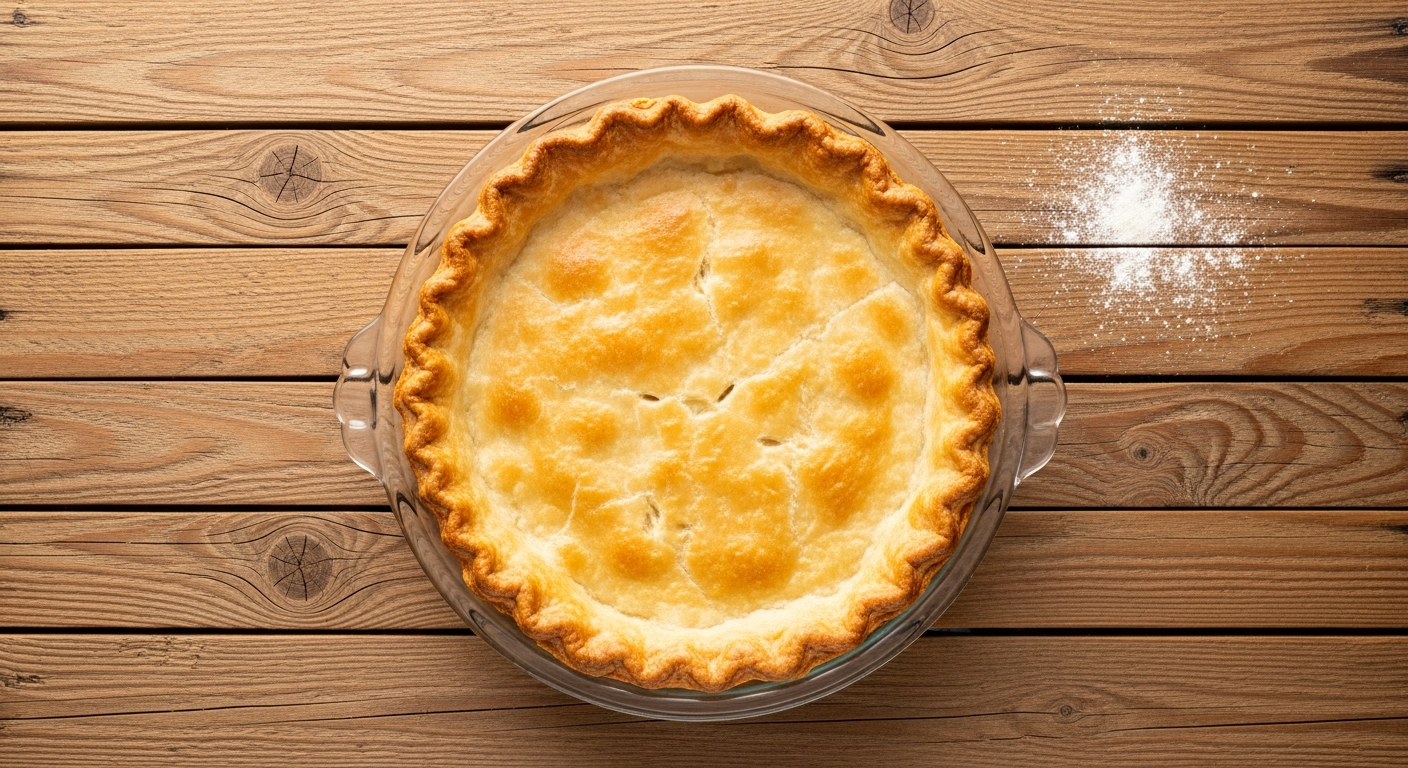
Method 1: No-Chill Roll-Out Pie Crust (Makes 2 Crusts)
This is the one you want for apple pie, pumpkin pie, or any recipe that calls for a top crust. It's flakier than the press-in version and more traditional — but it genuinely doesn't need to be refrigerated before you use it.
Ingredients
- 2½ cups all-purpose flour
- 1 tsp salt
- 1–2 tbsp sugar (for sweet pies — skip it for quiche or pot pie)
- 1 cup (2 sticks) cold unsalted butter, cubed small (salted butter works fine — just skip the added salt)
- 1 tbsp apple cider vinegar (optional, but I always use it — see why above)
- 5–7 tbsp ice water
That's it. Everything you probably already have.
Instructions
-
Cut the butter into small cubes, roughly ½-inch. If your kitchen is warm, put the cubed butter in the freezer for 10 minutes before starting — this is the most important step.
-
Whisk together the flour, salt, and sugar (if using) in a large bowl.
-
Add the butter cubes to the flour. Using a pastry cutter, two knives, or your cold fingertips, cut the butter into the flour until the mixture looks like coarse crumbs with some pea-sized chunks still visible. Visible butter chunks are a good sign — they're what makes the crust flaky. Work quickly so the butter stays cold.
-
Add the vinegar to ½ cup of ice water in a measuring cup. Drizzle 1 tablespoon at a time over the flour mixture, tossing with a fork after each addition.
-
Stop adding water when the dough holds together when you pinch a handful — it should look lumpy and rough, not smooth. If it's still crumbly, add one more tablespoon of water. If it feels warm or sticky, refrigerate the bowl for 10 minutes.
-
Divide the dough into two equal mounds. Gently shape each into a disc about an inch thick.
-
Flour your work surface generously. Roll one disc out to roughly 12 inches across — about ⅛ inch thick — working from the center outward.
-
Roll the crust loosely around your rolling pin, then unroll it over your pie dish. Gently press it into the corners, trim the edges, and fill and bake per your pie recipe.
A few things that might go wrong:
- Crust has cracks while rolling? Let it rest on the counter for 2 minutes — the gluten just needs a quick break.
- Dough feels greasy or soft? Refrigerate it for 10 minutes and continue.
- Crust shrinks while baking? Next time, let the shaped crust rest in the pan for 5 minutes before adding the filling.

Method 2: No-Chill Press-In Pie Crust (Single Crust, 5 Minutes)
No rolling pin. No pastry cutter. Just a fork and your fingers. This version uses melted butter and gets mixed directly in the pie pan, which means you have one fewer bowl to wash.
I'll be honest about the texture: this crust comes out more crumbly and cookie-like than flaky. It's not the same as Method 1. But it's also the easiest thing you'll ever bake, and it works beautifully for quiche, custard pies, crumble-topped pies, and any pie where the filling is really the star.
Ingredients
- 2 cups all-purpose flour
- 1 tbsp sugar (omit for savory pies and quiche)
- 1 tsp salt
- 6 tbsp butter, melted (unsalted or salted — either works here)
- 2–3 tbsp cold water
Instructions
-
Add the flour, sugar (if using), and salt directly to your 9-inch pie pan. Stir with a fork to combine.
-
Pour in the melted butter and 2 tablespoons of cold water. Stir with the fork until the mixture starts clumping together.
-
If the dough still seems dry and won't hold together, add a third tablespoon of water, a little at a time.
-
Press the dough evenly across the bottom of the pan and up the sides, aiming for roughly even thickness all around.
-
Fill immediately and bake according to your filling recipe — or blind bake the shell first (see below).
The bottom of this crust bakes up surprisingly crisp. I was skeptical the first time I tried it. I'm not anymore.
Blind Baking a No-Chill Crust
Some pies — like lemon curd, custard, or quiche — need the crust to be baked before you add the filling. This is called blind baking, and both methods above work well for it.
To blind bake:
- Poke the bottom of the crust all over with a fork.
- Line the crust with parchment paper and fill it with pie weights or dried beans. Regular dried beans from the pantry work perfectly — I've been reusing the same bag for years.
- Bake at 375°F for 15–18 minutes, until the edges are lightly golden. Remove the parchment and weights, then bake for another 5 minutes until the bottom looks dry rather than shiny.
Can You Make This Ahead and Freeze It?
Yes — both versions freeze well, which makes this "no chill" crust useful for holiday planning too.
Roll-out version: Form the dough into discs, wrap each one tightly in plastic wrap, and slide them into a freezer bag. They keep for up to 3 months. Thaw overnight in the fridge before rolling out.
Press-in version: Press the dough into your pie pan, wrap the whole pan in plastic wrap, and freeze it as-is. Bake it directly from frozen — just add 5 extra minutes to the bake time.
This is how I get ahead of Thanksgiving without spending the whole day baking.
FAQ
Can you skip chilling pie dough? Yes — if the butter stayed cold during mixing and you didn't overwork the dough. Adding a tablespoon of vinegar to your ice water also helps by inhibiting gluten development, which is one of the main reasons traditional crusts need to rest.
What happens if you don't chill pie crust? If your butter stayed cold during preparation, nothing bad happens — the crust will bake up flaky just fine. If the butter warmed up and started melting into the flour before baking, the crust may turn out tougher and less layered. Working quickly is the key.
Does vinegar help pie crust? Yes. A tablespoon of apple cider or white vinegar mixed into your ice water inhibits gluten formation, which is one of the main reasons traditional recipes call for chilling. It makes the dough more tender and easier to roll without fighting it.
Can no-chill pie crust be used for a double-crust pie? The roll-out recipe (Method 1) yields two crusts, so yes — use one for the bottom and one for the top or a lattice. The press-in version is single crust only.
What's the difference between roll-out and press-in pie crust? Roll-out uses cold, cubed butter cut into the flour — it produces a flakier, more classic crust and works for any pie. Press-in uses melted butter and gets pressed directly into the pan — no rolling needed, faster, but the texture is more crumbly and cookie-like. If you've never made pie crust before and you want the easiest possible start, Method 2 is it.