Best Flour for Sourdough: Budget-Friendly Choices
Tl;DR: If you’re just starting your sourdough journey, you don’t need to break the bank on fancy flours. After years of testing different options in our family kitchen (and making plenty of mistakes along the way!), I’ve learned that you can absolutely make gorgeous, delicious sourdough with budget-friendly pantry staples – you just need to know a few simple tricks.
Table of Contents
- Start Here: Best Budget Flours (and Where to Find Them)
- AP vs Bread vs Whole Wheat/Rye—What Changes
- Pantry Swaps and Boosters (Make What You Have Work)
- Dial In Your Dough: Hydration, Timing, and a Base Formula
- Starter Care on a Budget
Start Here: Best Budget Flours (and Where to Find Them)
When you’re just starting your sourdough journey, you don’t need to hunt down fancy bread flours or specialty grains. The best bang-for-your-buck flours are often right in your local supermarket or warehouse store. Here’s what to buy, where to find it, and how to make it work for your sourdough!
Which Flours Give You the Most for Your Money?
Store-brand all-purpose (AP) flour is your best friend! Brands like Great Value (Walmart), Kroger, Safeway’s O Organics, and Aldi’s Baker’s Corner offer solid quality at a price that won’t make you wince.
Big bags from warehouse stores like Costco (Kirkland brand) or Sam’s Club usually have the lowest cost per pound. Look for 10–25 lb bags of AP or bread flour – they’re perfect for families who bake regularly.
Local grain co-ops or mills sometimes sell in bulk (25–50 lb bags) and can be cheaper per pound than packaged specialty flours. Plus, you’re supporting local businesses!
Restaurant-supply stores can be a hidden gem for affordable bulk flour if you can access them.
Farmers’ markets or small local mills might cost a bit more but offer fresher whole grain options if you want to experiment down the road.
Do You Need Unbleached Flour?
Unbleached flour is preferable because it tends to have better gluten strength and flavor, which helps your sourdough rise and develop that nice chewy crumb we all love.
But bleached all-purpose flour works too! You might notice a softer, less chewy loaf, and you’ll want to tweak your recipe just a bit:
- Use slightly lower hydration (less water)
- Handle the dough gently to avoid overworking it
Tips for Finding Cheap Flour Near You
Check Costco or Sam’s Club for large bags — these often have the best price per pound and last our family months.
Visit Walmart, Aldi, or your local supermarket for affordable store-brand AP flour that works beautifully for everyday baking.
Explore local grain mills or co-ops for bulk buying options – sometimes you can split large bags with neighbors!
Buy whole-grain flours in smaller amounts if you don’t bake with them often, and store them in the freezer to keep them fresh longer.
Pro tip: Flour stored airtight in the freezer can last 6–12 months, but whole grain flours spoil faster. Label your bags with the purchase date and use older flour first to avoid waste – nobody wants to throw away good flour!
How to Store Flour Without Wasting Money
Only buy big bags if you’re sure you’ll use them within a few months – there’s no savings in flour that goes bad!
Freeze any extra flour in airtight containers or heavy-duty freezer bags to extend its life.
Keep flour in opaque containers away from heat and light to preserve quality.
Rotate your stock by using the oldest flour first – just like we do with our canning jars!
By starting with these budget-friendly flours and smart shopping tips, you’ll be well on your way to baking delicious sourdough without breaking the bank or cluttering your pantry.
AP vs Bread vs Whole Wheat/Rye—What Changes
You might be wondering if your trusty all-purpose (AP) flour can really make a good sourdough loaf, or if you need to splurge on bread flour or fancy whole grains. The good news? You can bake great sourdough with what you have – a few simple tweaks will help you get there!
Baking with 100% All-Purpose Flour: What to Expect
Yes, you can bake very good sourdough using only all-purpose flour! Here’s what you’ll notice compared to bread flour:
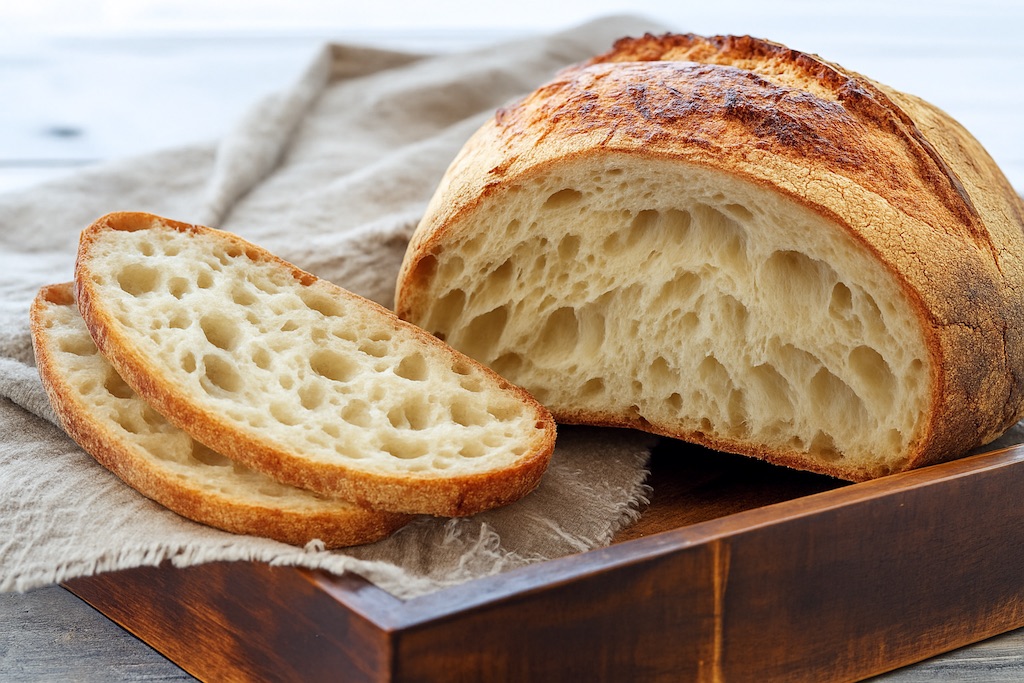
Crumb and chew: AP flour usually gives a softer, less chewy crumb. That’s totally fine for most home bakers – it makes wonderful sandwich bread!
Oven spring and crumb openness: You’ll get good rise, but the crumb might be a bit tighter with fewer big holes than bread flour, especially if you like very wet dough.
Hydration: AP flour absorbs a bit less water, so dough at the same hydration feels wetter than with bread flour.
Flavor: No big difference here! Flavor depends more on fermentation and any whole grains you add.
How to get the best from AP flour:
- Start with moderate hydration—around 68–74% water to flour
- Use an autolyse (resting the flour and water) for 20–60 minutes
- Do a few stretch-and-folds during bulk fermentation instead of heavy kneading
- If the dough feels slow, give it more time and keep it cool to help gluten develop
Bread flour shines if you want very wet dough (78%+ hydration), a super open crumb, or a chewy texture. It also helps if you’re using lots of whole wheat or rye, which can make dough heavy.
Tip: For most beginner homesteaders, 100% AP flour is a budget-friendly winner that won’t hold you back from making delicious bread your family will love!
Adding Whole Wheat or Rye: Simple Ratios for Rise and Flavor
If you want to boost flavor and nutrition without ending up with a dense loaf, try blending in whole wheat or rye from your pantry. Here’s a quick guide:
| Blend Type | Whole Grain % | Notes |
|---|---|---|
| Mild | 10–20% whole wheat or 5–20% rye | Adds flavor and aroma with little density |
| Moderate Boost | 20–30% whole wheat | More flavor and nutrition; needs more water and gentle handling |
| Rye Accent | 5–20% rye | Rye absorbs more water; keep low unless experienced |
Example blends for 500 g total flour:
- Mild: 450 g AP + 50 g whole wheat (10%)
- Balanced: 400 g AP + 100 g whole wheat (20%)
- Rye accent: 450 g AP + 25–50 g rye (5–10%)
Adjustments when adding whole grains:
- Add 3–6% more water for every 10% whole grain (e.g., 15–25 g extra water for 50 g whole wheat)
- Extend autolyse and bulk fermentation times
- Use extra stretch-and-folds to build gluten strength
- Keep total whole grain under 30% for a lighter loaf unless you want a hearty, dense bread
If you want a strong flavor but still a light crumb, try 80% AP + 20% whole wheat or 85% AP + 15% rye – it’s the perfect balance!
With these simple ratios and tweaks, you can confidently use pantry staples to bake delicious sourdough without breaking the bank or buying specialty flours.
Pantry Swaps and Boosters (Make What You Have Work)
If you’re working with basic store-brand all-purpose (AP) flour, you might wonder how to get that chewy, open crumb you see in fancy bread flour loaves. Good news: a little vital wheat gluten (VWG) can help you boost your flour’s protein and gluten strength without breaking the bank!
How Much Vital Wheat Gluten to Add — And When to Skip It
Here’s a simple rule to follow: add about 1.5–2% VWG by total flour weight. That means:
| Total Flour | VWG Amount | Approximate Teaspoons |
|---|---|---|
| 500 g | 8–10 g | 2½–3 tsp |
| 125 g (1 cup) | 2–3 g | ¾–1 tsp |
When to add VWG:
- Your AP flour feels weak—like dough that’s too soft and won’t hold shape
- You want a chewier loaf with a more open crumb
- You’re using a lot of whole grain (25% or more) and need extra gluten strength
When to skip VWG:
- Your AP flour already works well for you
- You prefer a softer, less chewy crumb
- You want a delicate, open artisan crumb (too much gluten tightens the loaf)
- You’re baking mostly rye bread—rye behaves differently, and extra gluten won’t fix its density
How to add it: Mix the VWG evenly into your dry flour before adding water. If you add VWG, you can usually increase hydration by 1–3% because the dough handles water better.
Tip: If you’re measuring by volume, remember that 1 teaspoon of VWG weighs about 3.3 grams. Using a kitchen scale is best for accuracy – and it makes baking so much more consistent!
What About Bleached AP or Self-Rising Flour?
Bleached AP flour is common and totally usable for sourdough, but it behaves a bit differently:
- Expect a softer, more tender crumb and possibly less oven spring
- Use slightly lower hydration—reduce water by 2–4% compared to unbleached or bread flour
- Give your dough a longer autolyse and several gentle stretch-and-folds to help gluten develop
- Consider adding a small amount of VWG (1–2%) if you want more chew and structure
Self-rising flour? It’s best to avoid it for sourdough bread. It already has baking powder and salt mixed in, which messes with your starter and fermentation. If it’s all you have, save it for pancakes, crackers, or quickbreads—not your sourdough loaf!
Things to avoid:
- Don’t mix self-rising flour with your starter expecting normal sourdough results
- Don’t assume bleached AP will behave like unbleached without adjusting hydration and timing
With these pantry swaps and boosters, you can confidently bake great sourdough loaves using what you already have. No need to splurge on specialty flours—just a few tweaks and you’re on your way to amazing homemade bread!
Dial In Your Dough: Hydration, Timing, and a Base Formula
When you’re working with all-purpose (AP) flour or bread flour from your pantry, small tweaks in hydration, timing, and handling can make a big difference in your sourdough loaf. Here’s a simple, reliable base formula and some easy-to-follow tips to get you baking with confidence—no fancy flours or gear needed!
Hydration: How Much Water to Use?
AP flour: Start with about 68–72% hydration. This means for every 100 grams of flour, use 68 to 72 grams of water. It’s easier to handle and perfect for beginners who are still getting comfortable with sticky dough.
Bread flour: It soaks up more water, so you can go higher—around 72–78% hydration—if you’re comfortable with a stickier dough.
If you want a slightly more open crumb with AP flour, try nudging hydration up by 1–3% as you get more confident. Don’t rush it though – mastering lower hydration first will make you a better baker!
Timing and Handling Tips
Autolyse: Mix your flour and water first, then let it rest for 20–60 minutes. This helps the flour absorb water and starts gluten development. AP flour benefits from a longer autolyse to build strength – it’s like giving your dough a head start!
Stretch-and-fold: Instead of heavy kneading, do gentle stretch-and-folds every 30–45 minutes during the first 2–3 hours of bulk fermentation. AP dough likes gentle, frequent folds; bread flour can handle more aggressive folding.
Bulk fermentation: Let your dough rise at room temp (70–75°F) for 3–5 hours. If your AP dough feels weak, give it a bit more time and focus on folds to build structure.
Pro tip: Use wet hands for stretch-and-folds to keep the dough from sticking instead of adding extra flour. A bench scraper is your best friend for shaping sticky dough – trust me on this one!
A Simple, Scalable Base Formula for One Loaf
| Ingredient | Weight (grams) | Baker’s % (of flour) |
|---|---|---|
| Total flour | 500 | 100% |
| Water | 360 (AP) / 375–380 (bread flour) | 72% (AP) / 75–76% (bread flour) |
| Starter (100% hydration) | 100 | 20% |
| Salt | 10 | 2% |
Step-by-Step
- Mix flour and water until no dry bits remain. Let it autolyse for 30–45 minutes.
- Add starter and salt, mix well until everything’s combined.
- Bulk ferment at room temp (70–75°F) for 3–5 hours. Do 3–4 stretch-and-fold sets every 30–45 minutes during the first 2–3 hours.
- Pre-shape into a round, rest on the bench for 15–30 minutes.
- Final shape your loaf – don’t be afraid to build good tension!
- Proof either at room temp for 1.5–3 hours or cold proof in the fridge overnight (8–18 hours) for better flavor and easier timing.
- Bake in a preheated Dutch oven at 450–475°F: 20 minutes covered, then 15–25 minutes uncovered until deep brown and hollow-sounding when tapped.
Scaling Up or Down
Keep the percentages the same to scale your recipe. For example, if you want two loaves, double all weights. If you want a smaller loaf, halve them. The beauty of baker’s percentages is that they scale perfectly every time!
With these simple tweaks and a solid base formula, you can confidently bake delicious sourdough using just your pantry staples. Remember, dough gets stronger with time and gentle handling—no need to splurge on fancy flours or equipment to get great results that’ll make your family proud!
Starter Care on a Budget
Keeping your sourdough starter happy and healthy doesn’t have to cost a lot or waste flour. Here’s how you can maintain a strong starter using just your everyday pantry staples, with easy feeding schedules and smart ways to use your discard!
Use What You Bake With: All-Purpose Flour Works Great
You don’t need fancy bread flour to feed your starter! The cheapest, simplest choice is the same all-purpose (AP) flour you already have in your pantry. Feeding your starter with the flour you bake with keeps the flavor consistent and avoids wasting specialty flours just for feeding.
Your starter will adapt beautifully to whatever flour you give it – these little ecosystems are tougher than you might think!
Keep Your Starter Small to Cut Waste
A little starter goes a long way! Keeping about 20–30 grams (roughly 2 tablespoons) of starter is enough for most home baking. Smaller amounts mean less discard and less flour wasted – which keeps your grocery budget happy.
Feeding Schedules That Fit Your Baking
If you bake once a week or less:
Store your starter in the fridge. Each week, discard down to 20–30 g, then feed with a 1:2:2 ratio (starter:flour:water by
Frequently Asked Questions (FAQ)
Can I use AP flour for sourdough starter?
Yes. AP flour is perfectly fine for feeding and building a starter, especially if you’re keeping costs down with store-brand AP flour. Use your usual starter feeding routine (often around 20–30 g of starter with equal parts flour and water) and store it in the fridge if you bake weekly to cut waste.
Is bleached flour okay for sourdough, or should I stick to unbleached?
Bleached flour can work, but it behaves a bit differently. Expect a softer crumb and possibly less oven spring, and adjust by lowering hydration 2–4% and giving the dough a longer autolyse. You can also add a small amount of VWG if you want more chew and structure.
What hydration level should I use with AP flour for sourdough?
For AP flour, start around 68–72% hydration. You can inch up to 74% as you gain confidence, but avoid rushing: higher hydration with AP is doable, just stick with gentle folds and a longer bulk fermentation as needed.
How can I improve gluten and crumb using budget flours?
If your flour is weaker, add 1.5–2% vital wheat gluten by total flour weight to boost gluten strength. Mix VWG evenly into the dry flour, then increase hydration by about 1–3% if needed. Pair this with the preferred technique—stretch-and-folds over kneading—to get a chewier, more open crumb without buying specialty flours.
Where to buy cheap bread flour near me?
Look at big-box and warehouse stores for bulk options (Costco or Sam’s Club often have the best price per pound). Also check Walmart, Aldi, or local co-ops for store-brand flour that works well for sourdough. Local mills or co-ops can offer bulk options you can split with neighbors, giving you the best bulk flour for homesteaders and affordable store-brand flour sourdough results.


